HOW TO INSTALL

Review the installation process of the Outbraker ABS Brake System

LEVER INSTALLATION (MTB)

  1. Remove the brake hose from the lever using an 8mm wrench.
  2. Install the Outbraker ABS on the desired brake lever using a 12mm wrench.
  3. Tighten the connection bolt using an 8 mm wrench while holding the brake cable inside the Outbraker body.
  4. Bleed your brake and add oil (follow the instruction manual of the hydraulic brake brand that you are using).
  5. Adjust the desired position using the 0.9 mm hex key included in the package.
DOWNLOAD INSTALLATION MANUAL

CALIPER INSTALLATION (ROAD)

  1. Disassemble the brake caliper from the fork. Remove the brake pad and install bleed spacer in the caliper.
  2. Remove the brake hose from the caliper using 8mm spanner.
  3. Join Outbraker onto the brake caliper using 12mm spanner. Then, tighten the connecting bolt while pushing on the brake hose using 8mm spanner.
  4. Bleed your brake and add oil (follow the instruction manual of the hydraulic brake brand that you are using).
  5. Assemble the caliper onto the fork again. Then, remove the bleed spacer and set the brake pads again in the caliper.
  6. Fix the angle using the hexagonal wrench included.
DOWNLOAD INSTALLATION MANUAL

HOW TO INSTALL

Review the installation process of the Outbraker ABS Brake System

LEVER INSTALLATION (MTB)

  1. Remove the brake hose from the lever using an 8mm wrench.
  2. Install the Outbraker ABS on the desired brake lever using a 12mm wrench.
  3. Tighten the connection bolt using an 8 mm wrench while holding the brake cable inside the Outbraker body.
  4. Bleed your brakes and add oil (follow the instruction manual of the hydraulic brake brand that you are using).
  5. Adjust the desired position using the 0.9 mm hex key included in the package.
DOWNLOAD INSTALLATION MANUAL

CALIPER INSTALLATION (ROAD)

  1. Disassemble the brake caliper from the fork. Remove the brake pad and install bleed spacer in the caliper.
  2. Remove the brake hose from the caliper using 8mm spanner.
  3. Join Outbraker onto the brake caliper using 12mm spanner. Then, tighten the connecting bolt while pushing on the brake hose using 8mm spanner.
  4. Bleed your brake and add oil (follow the instruction manual of the hydraulic brake brand that you are using).
  5. Assemble the caliper onto the fork again. Then, remove the bleed spacer and set the brake pads again in the caliper.
  6. Fix the angle using the hexagonal wrench included.
DOWNLOAD INSTALLATION MANUAL

HOW TO INSTALL

Review the installation process of the Outbraker ABS Brake System

HOW TO INSTALL

Review the installation process of the Outbraker ABS Brake System

LEVER INSTALLATION (MTB)

  1. Remove the brake hose from the lever using an 8mm wrench.
  2. Install the Outbraker ABS on the desired brake lever using a 12mm wrench.
  3. Tighten the connection bolt using an 8 mm wrench while holding the brake cable inside the Outbraker body.
  4. Bleed your brake and add oil (follow the instruction manual of the hydraulic brake brand that you are using).
  5. Adjust the desired position using the 0.9 mm hex key included in the package.
DOWNLOAD INSTALLATION MANUAL

CALIPER INSTALLATION (ROAD)

  1. Disassemble the brake caliper from the fork. Remove the brake pad and install bleed spacer in the caliper.
  2. Remove the brake hose from the caliper using 8mm spanner.
  3. Join Outbraker onto the brake caliper using 12mm spanner. Then, tighten the connecting bolt while pushing on the brake hose using 8mm spanner.
  4. Bleed your brake and add oil (follow the instruction manual of the hydraulic brake brand that you are using).
  5. Assemble the caliper onto the fork again. Then, remove the bleed spacer and set the brake pads again in the caliper.
  6. Fix the angle using the hexagonal wrench included.
DOWNLOAD INSTALLATION MANUAL

SETTING

ABS BRAKE TECHNOLOGY

The Outbraker ABS Brake System is regulated by its characteristic black dial. You can adjust the braking power based on your weight, terrain conditions, braking style…

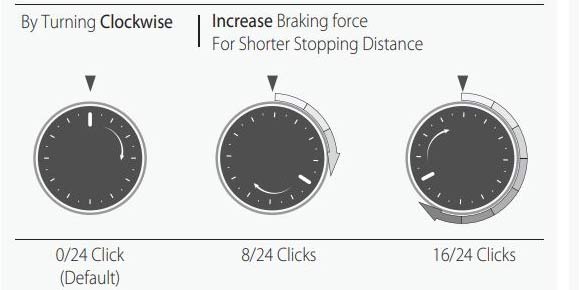
The Outbraker ABS comes standard with the Dial in “Neutral Position” so braking is not affected.

To activate the Outbraker ABS and the anti-lock function, we must turn the dial clockwise. The system supports up to 24 different adjustment positions (“clicks”).

To adjust, first perform a low speed braking test. As long as the front wheel of the bike is not locked at low speeds, it will not lock at higher speeds either. The reason is that the maximum oil pressure in the caliper is in both cases the same, but the inertia generated at high speeds is stronger.
 
In this way, we will adjust the device to obtain a safe braking in the optimal distance (the minimum possible without blocking the front wheel of the bike).

Recommendation: Our advice is that you turn the dial as far as it will go in a clockwise direction (maximum activation of the ABS function) and, from there, go down setting positions (“clicks”) until you find your optimal setting.

DOWNLOAD SETTING MANUAL
SHOP NOW